
As a seasoned airsoft gun tech, I have encountered more problems than I can count. Each of these problems could have been avoided if only I had been more resourceful.
To help you not run into these issues on your airsoft tech journey, here is the complete list of my top 23 airsoft tech tips and mistakes. Hopefully, this list saves you countless headaches.
1. Bad Airsoft Gearbox Shimming
This is a very crucial one on my list. This is because the shimming done at the factory is something you cannot really count on, as it is a very time-consuming process. And in the business world, time equals money, which is why the greater majority of airsoft guns have terrible shimming. One known exception to this general rule is the airsoft guns from the famous brand, Tokyo Marui.
For those who are unfamiliar, shimming is the process of adding very tiny washers to the face of your gears. This helps reduce the amount of play between the gears, which in turn makes the gears perform efficiently with maximum contact.
By shimming your airsoft gun THE RIGHT WAY, you will also notice that your gun will run quieter and smoother. Yay, less screeching and whining from your plastic plinker.
Although this task is very time consuming, it is considered a necessity for premium performance by most professional airsoft techs.
I will be working on a shimming guide and post it here when it is completed.
2. Bad Airsoft Motor Height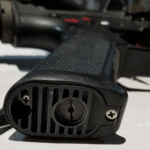
This is an easier issue to fix. If your motor height is not adjusted properly, then the first thing you will notice is loud screeching or other weird noises coming from the pinion-bevel gear contact. Also, your motor will be consuming more current than it needs from your battery, causing faster discharge rates. This is because your pinion gear will either not be receiving enough contact, or it will have too much contact with the bevel gear.
This can be easily fixed by adjusting the screw on the base of your pistol grip, which will either be a flat head or an allen key type. Keep in mind if your bevel gear in the gearbox is shimmed too tight, or too loose, then you may still have these noticeable issues. Its recommended to shim your gun and adjust the motor height in the gearbox at the same time to do it the proper way.
3. Loose Piston Head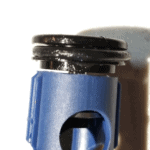
I cannot tell you how important it is to secure your piston head, especially if you are doing your own tech work. The piston head is well known to come loose, and so you should always make sure it is fully secure when opening your gearbox. Complete this easy task or you may risk failure in your gearbox during play, which would not be fun.
Check the most recent Price on Evike
How to prevent or fix it:
Apply a medium type loctite, on the piston head screw. Then tighten it and let it cure. Try not to cycle the gun too soon, as the loctite may not have cured yet. Check the specifications on your bottle of loctite.
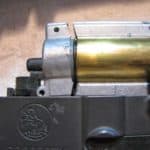
4. Not Correcting AOE in the Gearbox
Holy, moly, this is deemed a big one by all airsoft techs! By completing this modification, you will maximize the contact area between your piston’s pickup tooth and your sector gear. This will extend the life of your airsoft gun to infinity (OK, well maybe not that long, but it will last a really long time).
How to correct it:
Remove everything from your gearbox except the piston and sector gear. Then spin your sector gear counter-clockwise until it touches the piston’s pick up tooth. Next…
For the full guide on how to correct AOE, click here.
4. New Piston Rack Not Glued in the Piston
This is something that is overlooked by people learning to upgrade or fix airsoft guns. If you purchase a new piston, first identify if it has a metal tooth rack. If it does, then you need to secure it in place with super glue so it does not shift when you cycle your gun.
Before gluing anything down, however, make sure you have corrected AOE. You don’t want to glue it place and then realize you need to shave down 1 or 1.5 teeth on the rack.
When gluing the rack to the piston, make sure it is in the correct position, and the edge of the rack isn’t poking out. Proper alignment is key.
Some techs also prefer to use epoxy, but feel free to use what you prefer. Also, it is good to know that cyanoacrylate is the technical chemical name for superglue.
5. Not Using a Lipo Battery for Maximum Power

If used correctly and safely, lithium polymer batteries are the best batteries for your AEG. These batteries work at least 5x better than any Ni-MH battery ever will. They are significantly smaller when compared to their counterpart and will give your gun a better trigger response.
If you don’t have a mosfet installed, I highly suggest using a 2 cell lipo (these are known as the 7.4-volt lipos). Otherwise, definitely go for the 11.1 lipo (3 cells) to achieve maximum trigger response as far as batteries are concerned.
6. Bad Gearbox Lube
Okay, enough of using that Chinese grade ear-wax in your gearbox as a lubricant. You should invest $10 into a high-quality grease that will help your gears last longer without making an ugly mess. I really like to use Super Lube as it works extremely well, and does not create a mess.

When applying the grease, use a generous amount, but don’t drown your gearbox in it. Any excess grease will build up in certain spots, so you can just clean it off the next time you open up your gearbox.
7. Poor Gearbox Shell Quality
There is nothing worse than having your gearbox crack during a game. Trust me, its happened before.
A lot of cheaper guns use pot-metal for their gearboxes and this is a HUGE problem– especially if you use an M4 style gun or V2 gearbox. These specific types of gearboxes are a lot more likely to crack due to their design, which will render your gun useless until you replace the shell.
Even if your gearbox crack is small, it will eventually expand and get worse. This means that in the future, you will have to replace the whole gearbox shell, which is terrible news. To extend the life of your stock gearbox shell, see the next point.
The gearbox shell that I really like is the Retro Arms CNC one. It has a lot of really cool features, like a quick-change spring guide system, deeper wire channels (so the motor does not tear them up), as well as pre-radiused windows in the cylinder to prevent stress cracks. Here is an image of my most recent build in progress. 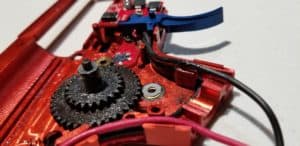
8. Not Radiusing Your Gearbox Shell
The best way to extend the life of a cheap gearbox shell is to radius the gearbox shell window corners. To do this simply take a cylindrical file and round the corners ever so slightly. By doing this you will distribute the piston’s stress more equally to the gearbox shell. This modification only takes a few minutes, so be sure to complete this if you open up your gearbox. Some companies now even include this as a default, so be sure the examine if your gearbox has this feature.
9. Not Using a Mosfet
What is this nerdy thing that people refer to as a mosfet? Well according to my calculations, the appropriate gearbox seismic velocity of the diameter is… Ok, well it’s not that complicated. Nerd mode off.
A mosfet stands for a metal-oxide-semiconductor field-effect transistor. In simple terms, a mosfet is an electrical component that regulates current from the battery to the trigger assembly more efficiently. It is generally agreed that this is considered a crucial element when upgrading your gearbox. Without a mosfet, you are most likely burning out your trigger contact switch by electrical arching. Also, you are not providing the most efficiency to your electrical circuit. This means that you are delaying your trigger response electrically.
In the last 5 years or so, there have been a lot of advancements to Mosfets, like the Gate Titan. This mosfet is awesome because you can program different firing controls (like burst mode), as well as reduce the trigger pull (letting you spam semi-auto MUCH easier than before)

10. Using a Weak Motor
For AEG’s, I have deemed that replacing the motor is one of the most cost-effective upgrades (like the mosfet). Swapping your motor will greatly improve your trigger response, and thus help you get those quick pop shots on the field. If you decide to upgrade your motor, just be sure to get a hi-torque motor with neodymium magnets. These magnets are super important since they help the motor gain the extra torque to cycle your gearbox quicker.
The best thing about this upgrade is that it only takes around 5-10 minutes and you don’t need to open your gearbox. However, be sure to take this upgrade cautiously if you are new to teching. Some common mistakes include: reversing the polarity (wiring-to-motor is reversed), stripping the motor screws, dropping the screws into the gearbox, losing the motor spring, and crunching up your wiring. Don’t let these small things prevent you from doing this, just cautiously take your time. I personally recommend the ZCI hi-torque motor as it has very strong neodymium magnets and has a great value for the amount of torque it has.
Regardless, whichever hi-torque motor you decide to purchase, you will definitely have an advantage on the airsoft field. If you are a milsim player, then I would consider this a must for any AEG.
For more detailed information on airsoft motors, be sure to check out this post (and find out why you SHOULDN’T use Hi-Speed motors).
11. Using a FULL Metal Piston
Because full metal pistons are rare, I wasn’t considering putting this on the list. However, an old teammate put one in his gun and it wreaked havoc, so I thought I should warn you.
Metal pistons are BAD. VERY BAD. They are super heavy and can cause timing problems when it comes to the timing cycle of the gearbox. When this timing gets misaligned, your piston can get destroyed, your gears can strip, and more damage could occur.
12. Using Low-Quality BB’s
As a broke newcomer to airsoft, I always thought cheaper ammo was better since you can get more for your buck. However, this type of thinking got me worse performance on the field, as I always ended up getting bad BBs.
Cheaper BB’s tend to have very small inconsistencies in their diameter and shape, which can result in misfeeds. Apart from the standard Walmart ammo, some bio BBs are known to leave residue behind in the barrel. This can build up and mess up accuracy and reliability.
Ideally, you want to find BBs which have the highest quality to price ratio, as some BB brands do run really expensive.
The key is to try a bunch of different brands and to find the one that works the best for your gun and your wallet.
13. Having Lubricant On/In Your Hop-Up Unit / Bucking
I feel like this is widely unknown in the airsoft community, so I wanted to mention it.
Having any type of lubricant around or on your bucking is RUINING your accuracy. How you may ask?
Well, it’s quite simple.
A standard hop up unit works by providing friction from the nub onto your bucking and then onto your BB.
And what is the purpose of lubricant? To prevent friction.
So when you add lubricant to your hop up area, you are canceling out the effect to a certain extent.
In other words, your hop up nub can’t grip the bucking 100%, which may cause your accuracy to drop.
How to correct it:
Soak your bucking in soapy water to remove dirt and grease. Then remove any grease from the actual hop-up unit by using a Q-tip or something similar.
14. Loose Outer/ Inner Barrel
So you may have not noticed this on your airsoft gun, but there is a small chance that your inner barrel is wiggling inside of your outer barrel.
This means that every time you cycle your gun, your inner barrel may slightly “jump” due to the force of the piston’s impact. This creates inconsistent shots. If you want
How to correct it:
Create a wedge, or a “shim” to put in between the front of your inner barrel and your outer barrel. This would be on the flashier side of the gun.
To create a shim you can cut a piece of aluminum from a standard soda can and wedge it in place.
15. Using the Wrong Air Nozzle
In certain guns, just because something fits, does not always mean it will work. Take for example the KWA M4. If you were to swap out the standard air nozzle for one that is upgraded with an O ring, you will run into air leaks. Although the new nozzle’s O-ring is supposed to prevent leaks, the original air nozzle is not supposed to be changed, due to the design of the gearbox.
Anytime you plan on replacing a part, be sure to thoroughly do your research to prevent yourself problems and headaches.
16. Reversing Your Cylinder Port
This one commonly strikes new techs that are opening up their gearbox. What happens is they remove the cylinder during disassembly without noticing the orientation of the hole, or the port in the cylinder.
The reason this is a huge problem is that you will go from 400 FPS to around 50 FPS due to the significant amount of air volume you lose when the cylinder is reversed.
How to correct/prevent it:
Keep in mind that if your cylinder has no ports, do not worry about the orientation as it makes no difference.
Otherwise to prevent this problem, simply pay attention to the orientation of your cylinder port. A big tip is that the port sits always in the rear and that your piston does not compress the air until it passes the port (since the purpose of the port is to leak air). There are many different ports in different airsoft guns. The port size is typically decided upon the length of the inner barrel.
17. Misaligned Barrel
When experiencing accuracy problems, it is important to make sure your inner barrel is aligned properly to the hop-up unit. If misaligned, the hop-up window inside of the barrel will not align properly with the hop-up nub. This is important also when you use an R-hop patch.
How to correct it:
Look for a “lined” groove on the inner barrel. Turn the hop-up upside down and align both centers together. Then push the barrel into the hop-up unit slowly, without tearing up the hop-up bucking. Shine a light into the hop-up and make sure it is working correctly and aligned.
18. Making Multiple Changes At Once
A great tip when doing airsoft gun upgrades is to always limit the number of parts that you replace at once. This is because sometimes incompatibility issues may arise and you won’t be able to diagnose which part is causing the problem. Of course you still diagnose the issue with critical thinking, however, you won’t be 100% sure of which part is causing the issue.
Ideally, you would want to install a new part, reassemble your gun and then test to make sure everything is working as it should.
19. Not Using Better Battery Connectors
An easy way to improve the trigger response on your gun is to upgrade your plugs for the battery. This will take about 15 minutes if you have experience with soldering. You will need to solder a new male connector onto the end of the wiring on your gun, and a female connector on your battery. Most people switch from the rubbish Tamiya conector to deans connectors or XT-60 type connectors. Regardless of which route you take, you will reap the benefits of having less electrical resistance.
20. Using An Old O-Ring On Your Piston Head
Okay, as far as upgrades are concerned, this one cannot be any easier. To improve your air seal, you will want to swap out the standard O-ring on your piston head. From my experience, these stock piston O-rings are usually terrible and leak air like crazy. The exact size O-ring you want to purchase is a #14 O-ring. It should be available at Home Depot, just check the plumbing section.
One more tip is that you can slightly stretch out the new O-ring for a little better seal. To do this, simply stretch it over your cylinder, and heat it up from a distance using a lighter.
21. Using the Wrong Magazines
If your gun is experiencing feeding issues, then try to use the original magazine that came with your gun. If this magazine does not feed fine, then it means that the feeding issue is either from the hop-up, barrel, bucking, or inside the gearbox.
I will post a more in depth-guide here in the future on diagnosing feeding issues.
22. Having a Tear in Your Bucking
One of the easiest places to spot an air leak in your gun is inside your bucking. If any tears are present, this will cause small amounts of air to escape, reducing the consistency in your overall air volume. Inconsistencies in air volume will reduce accuracy depending on the size of the air leak.
If you find your bucking is ripped up, then you may have possibly torn it up while inserting the inner barrel into the hop up unit. Or it has fallen apart due to old age.
How to correct it:
If your bucking is torn, simply buy a replacement bucking to solve the problem. However, be more careful installing it this time into the hop-up unit after putting it on your barrel (turn your hop-up off all the way before installing it).
23. Getting Tears in Your Wiring
Ahh, a classic mistake that I have made myself many times. Tearing up your wiring can be easily avoided, but how and when does it happen?
For rear-wired V2 gearboxes, the number one spot seems to be where the wire crosses near the bevel-pinion gear contact. This wire needs to be super snug in order for it to not “spring” up and get chewed up by the gears. Some gearboxes, like the Retro Arms V2, have a handy, neat little groove in which you can tuck your wiring into.
The second way that most people crunch up their wiring is when they are installing their buffer tube. Sometimes the wiring gets in between the tube and the rear of the gun and you may not notice it until its too late.
Also for those who use a Spectre mosfet, another problem area would be where the external gearbox alignment pin goes into the gearbox shell. Sometimes the thin gauge spectre trigger board wire gets in the way while you are inserting the pin, and it gets cut up like butter. This has happened to me twice, so be sure to organize the wiring to prevent this!